Correcting Learners

Correcting learners is an important part of language teaching because it helps students notice their mistakes and improve their skills. The way we correct, and the time we choose to do it, can make a big difference to how students feel about learning. In this lesson, we will look at different techniques for correcting both spoken and written errors. You will learn when to correct immediately and when to wait, as well as how to correct in a way that supports learning without discouraging students. These strategies will help you create a positive classroom atmosphere and make your daily teaching more effective.
Learning Outcomes
By the end of this lesson, you will be able to:
- Identify a range of correction strategies for both oral and written errors.
- Choose appropriate correction techniques based on learner level, activity type, and context.
- Apply techniques such as finger correction, reformulating, delayed correction, and correction codes effectively.
- Promote peer and self-correction to develop learner autonomy.
- Understand when to correct and when to ignore errors to maintain motivation.
- Learning Outcomes
- Why Correcting Learners Matter?
- Oral Correction Techniques
- Written Correction Techniques
- Using a Correction Code for Correcting Learners
- Summary: Correcting Learners
- Correcting Learners: Common Questions And Answers
- Correcting Learners – A Practice Task
- Correcting Learners – Reference Resources
Why Correcting Learners Matter?
Correcting learners matters because it guides them toward using the language more accurately and confidently. When students make mistakes, they often don’t realize it on their own. Correction helps them notice what went wrong and understand how to improve. It also shows them that their teacher is paying attention and wants to help them succeed.
The way we correct can shape how students feel about learning. Supportive correction builds trust and keeps learners motivated, while harsh or poorly timed correction can make them feel nervous or discouraged. By correcting carefully and thoughtfully, teachers can help students grow, stay confident, and make steady progress in their language learning journey.
Oral Correction Techniques
Using Timelines
A timeline is a simple visual aid that shows when actions happen. It helps students understand how verb tenses work and the relationship between past, present, and future events.
Example:
Student: “I have finished my homework yesterday.”
Draw a timeline on the board:
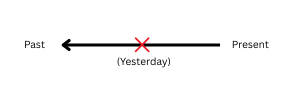
Explain that since the action happened at a specific time in the past, we use the simple past tense:
“I finished my homework yesterday.”
Classroom Tips:
- Use different colors for past, present, and future.
- Keep the timeline on the board while students practice so they can refer to it.
- Encourage students to come up and draw timelines themselves for extra practice.
Finger Correction
Using your fingers to represent each word in a sentence, you can point out exactly where a mistake occurs without speaking. This keeps the flow of the conversation while highlighting the error.
Example:
Student: “She go to school every day.”
- Thumb: She
- Index: go
- Middle: to
- Ring: school
- Pinky: every day
Pause at “go” and wiggle your index finger to show where the problem is.
Encourage the student to self-correct:
“She goes to school every day.”
Classroom Tips:
- Use this technique in quiet classrooms or with younger learners who respond well to visual cues.
- Practice it first with simple sentences so students understand what your gestures mean.
Gestures and Facial Expressions
Silent signals using body language to show there’s a mistake, without interrupting the student’s speaking flow.
Examples of Gestures:
- Past tense: Point backward over your shoulder.
- Future tense: Point forward.
- Missing article: Make a small letter “a” or “the” with your fingers.
- Wrong word choice: Tilt your head and raise an eyebrow.
Example:
Student: “Yesterday I go to the park.”
Teacher: (Points backward and tilts head.)
Student: “Oh! Yesterday I went to the park.”
Classroom Tips:
- Establish a set of standard gestures at the beginning of the course.
- Make sure students understand what each gesture represents.
- Use consistently to avoid confusion.
Phonemic Symbols
Using phonemic symbols from the phonemic chart to correct pronunciation mistakes.
Example:
Student: “I saw a ship” (but says /ʃiːp/ instead of /ʃɪp/).
Teacher: Points to /ɪ/ on the phonemic chart.
Student realizes the correct sound is /ɪ/, not /iː/, and says “ship” correctly.
Classroom Tips:
- Display a phonemic chart in the classroom for easy reference.
- Encourage learners to keep a mini chart in their notebooks.
- Useful for intermediate and advanced learners who already know the basic symbols.
Echo Correcting
Repeating a student’s sentence with questioning intonation to signal that something might be wrong.
Example:
Student: “I am liking pizza.”
Teacher: “I am liking pizza?” (with rising intonation)
Student thinks and corrects: “Oh! I like pizza.”
Classroom Tips:
- Works well with confident learners who are not afraid to self-correct.
- Keep your tone friendly to avoid sounding sarcastic.
- Avoid overusing it so students don’t feel unsure about everything they say.
Identifying the Mistake
Directly pointing out an error and helping the learner focus on it.
Example:
Student: “He have a dog.”
Teacher: “Check the verb again. Does it match the subject?”
Student: “Oh! He has a dog.”
Classroom Tips:
- Use open-ended questions like, “Are you sure about that word?” instead of simply saying “That’s wrong.”
- Good for advanced learners who need to refine accuracy.
Delayed Correction
Correcting errors after a fluency activity so students are not interrupted while speaking.
Example:
During a role-play about ordering food, the teacher writes down common mistakes:
- “I am agree.”
- “She can sings.”
After the activity, write the sentences on the board and ask the class to correct them together.
Classroom Tips:
- Use symbols or abbreviations like SP for spelling or T for tense to keep track of error types.
- This is especially useful for speaking exams or debates where fluency matters most.
Peer and Self-Correction
Encouraging students to correct their own mistakes or help their classmates.
Example:
Student A: “She go to school every day.”
Teacher: “Can anyone help?”
Student B: “She goes to school every day.”
Classroom Tips:
- Build a supportive classroom culture so students feel safe correcting each other.
- Start with very simple sentences so learners gain confidence.
- Remind students to be polite and constructive.
Ignoring Errors
Choosing not to correct certain mistakes, especially when they are beyond the student’s current level or when fluency is the focus.
Example:
Beginner student: “Yesterday I goed to market.”
Teacher ignores the error and responds to meaning: “Oh! What did you buy?”
Classroom Tips:
- Focus on meaning during storytelling or free conversation.
- Gradually introduce corrections as the learner becomes ready.
- Avoid overwhelming beginners with too much correction.
Reformulating
Repeating the student’s sentence correctly without explicitly saying they made a mistake.
Example:
Student: “I eated breakfast.”
Teacher: “Oh, you ate breakfast? What did you have?”
The student hears the correct form naturally.
Classroom Tips:
- Works best with younger learners who may feel discouraged by direct correction.
- Always keep the conversation flowing.
Recasting
Rephrasing the student’s sentence in a more natural or native-like way.
Example:
Student: “I want to make a party.”
Teacher: “You mean you want to throw a party?”
Classroom Tips:
- Use recasting to build vocabulary and introduce more natural expressions.
- Follow up by having the student repeat the improved version.
Giving the Rule and Example
Explaining the rule behind the mistake and providing a clear example.
Example:
Student: “I saw a apple.”
Teacher: “Remember, we use ‘a’ before consonant sounds and ‘an’ before vowel sounds. For example: ‘a banana,’ ‘an apple.’”
Classroom Tips:
- Best suited for older or higher-level learners who can understand grammar rules.
- Avoid giving too much theory at once; keep explanations short and practical.
Written Correction Techniques
Correcting writing is different from correcting speaking because students can see and reflect on their mistakes. Written feedback gives them time to think carefully and make lasting improvements. Here are four common techniques for written correction, when to use them, and how to apply them step-by-step.
Teacher Correction
What it is:
The teacher writes the correct form directly on the student’s work. This method is helpful for low-level learners, who may not yet have the skills to self-correct, or when introducing new grammar or vocabulary.
When to Use:
- With beginners who are still learning basic structures.
- When teaching brand-new language items.
- When students need a clear example of correct usage.
- For urgent or repeated errors that must be fixed immediately.
Example:
Student writes: He go to school yesterday.
Teacher corrects directly: He went to school yesterday.
Classroom Tip:
- Use different colors: one for teacher corrections, another for student writing.
- Write a short explanation in the margin if needed, such as “Past tense of go = went.”
- Be selective: focus on the most important errors, not every single one, to avoid overwhelming the learner.
Pros:
- Provides a clear model for students to follow.
- Saves time when students are not ready for self-correction.
- Prevents confusion about what is correct.
Cons:
- Students may rely too much on the teacher instead of developing problem-solving skills.
- Can feel discouraging if every sentence is rewritten by the teacher.
Peer Correction
What it is:
Students swap papers and correct each other’s work using a correction code or checklist. This encourages collaboration and helps learners notice mistakes in their own writing by identifying them in others.
When to Use:
- In group or pair work, especially with intermediate or advanced learners.
- To build learner independence and critical thinking.
- After students are familiar with the correction code system.
Example:
Student A writes: I am study English because I want to travel.
Student B marks:
- vt above study to show a verb tense error.
Student A corrects to: I am studying English because I want to travel.
Classroom Tip:
- Model peer correction first by correcting a sample text together as a class.
- Remind students to be polite and constructive:
- Instead of saying, “This is wrong,” they can say, “I think this should be…”
- Rotate partners so learners get feedback from different people.
- Provide sentence starters for feedback such as:
- “I like how you used…”
- “Maybe you could change this part to…”
Pros:
- Promotes active learning and teamwork.
- Students become more aware of common mistakes.
- Builds confidence and responsibility.
Cons:
- Some students may feel shy about giving or receiving feedback.
- Incorrect corrections may happen if students don’t fully understand the language point.
- Teacher needs to supervise closely at first.
Self-Correction
What it is:
Students review and correct their own work using a checklist or correction code provided by the teacher. This develops autonomy, critical thinking, and problem-solving skills.
When to Use:
- Once students understand basic grammar and vocabulary.
- After introducing a new writing skill, such as paragraph structure or transition words.
- For ongoing assignments like journals or portfolios.
Example Checklist:
Before handing in their work, students check for:
- sp Spelling mistakes
- p Punctuation errors
- vt Verb tense accuracy
- agr Subject-verb agreement
- art Article use (a, an, the)
- Clear meaning and organization
Example:
Student writes: She have a cat and dog.
When reviewing, they notice the subject-verb agreement issue and correct to:
She has a cat and dog.
Classroom Tip:
- Teach students to read their writing aloud slowly to catch errors.
- Encourage them to leave a short time gap between writing and checking so they see their work with “fresh eyes.”
- Provide example sentences of common mistakes for reference.
- For extra challenge, ask students to highlight their corrections so you can see what they fixed.
Pros:
- Develops independent learning and editing skills.
- Encourages responsibility for their own work.
- Prepares students for real-world writing tasks.
Cons:
- Beginners may miss many mistakes at first.
- Some students may feel unsure about what to correct without guidance.
Ignoring Mistakes
What it is:
Choosing not to correct certain errors, especially when they are outside the lesson focus or do not interfere with understanding. This allows students to focus on fluency, creativity, and communication rather than perfection.
When to Use:
- During creative writing tasks, like storytelling or journaling.
- When focusing on a specific target language point, such as past tense verbs.
- With beginners who might feel discouraged by too much correction.
Example:
Lesson target: Using “will” for future plans.
Student writes: I will go to the park tomorrow and I am liking football.
Teacher corrects: I will go to the park tomorrow.
Teacher ignores: I am liking football (because continuous tense is not the focus yet).
Classroom Tip:
- Decide in advance which errors you will correct and which you will ignore.
- Tell students which types of mistakes they should focus on for that activity.
- Gradually expand correction focus as learners progress.
Pros:
- Keeps students motivated and confident.
- Reduces stress, especially for beginners.
- Encourages risk-taking and experimentation with language.
Cons:
- Some mistakes may become fossilized if never corrected.
- Students may be unsure which parts of their writing need improvement.
Using a Correction Code for Correcting Learners
Correction codes are a way to guide learners to find and fix their own mistakes instead of the teacher doing all the correcting. Instead of writing the correct form, you mark errors with symbols or abbreviations. These symbols tell students what type of mistake they’ve made, so they think about the problem and correct it themselves. This encourages active learning, self-reflection, and greater independence.
Why Correction Codes?
- Builds learner autonomy and problem-solving skills.
- Helps students notice patterns in their own errors.
- Saves teacher time during marking.
- Reduces the negative emotional impact of seeing a lot of “red ink.”
- Encourages deeper thinking about grammar, vocabulary, and meaning.
Common Correction Code Symbols

Example in Action
Student Writing:
I am interesting in science.
Teacher Feedback:
Write vt (verb tense) above interesting.
Student Self-Correction:
Realizes the correct form is:
I am interested in science.
Steps to Use Correction Codes Effectively
Introduce the Code System
- At the start of the term, explain each symbol clearly.
- Provide a handout or poster for students to keep in their notebooks.
- Practice together by correcting a sample text as a class.
Mark the Errors, Not the Corrections
- Underline or circle the error and write the appropriate symbol above it.
- Avoid giving the correct answer right away.
- Example:
I goes to school every day. → Teacher writes vt above goes.
Give Students Time to Self-Correct
- Allow students to revise their work using the code.
- They can do this individually, in pairs, or as a group activity.
Follow Up in Class
- Discuss common mistakes together.
- Encourage students to explain the corrections to their peers.
- If many students make the same mistake, plan a mini-lesson on that topic.
Review and Reflect
- After several activities, ask students to look for patterns in their errors.
- Example reflection question: “Which type of mistake do you make most often?”
Tips for Successful Use
- Start simple: Begin with a small set of symbols and add more gradually.
- Be consistent: Always use the same symbols so students remember them.
- Encourage peer checking: Have students swap papers and correct using the code.
- Avoid over-marking: Focus on key errors that relate to the lesson objective.
- Celebrate progress: Acknowledge when students successfully self-correct.
Summary: Correcting Learners
- Choose techniques wisely: Match correction strategies to the activity aim and learner level.
- Avoid over-correction: It can demotivate learners. Prioritize errors that affect meaning.
- Promote autonomy: Use self and peer correction to help learners become independent.
- Use concept questions: Check understanding of language use, not just form.
Example:
Student: “I will meet my friends tonight.”
Teacher: “Did you decide now or earlier?”
(To check if “going to” or present continuous is more appropriate.) - Address common errors: If multiple learners make the same mistake, plan a follow-up lesson on that language point.
Correcting Learners: Common Questions And Answers
Q1. How can I avoid discouraging students when correcting errors?
Focus on meaningful communication first. Use positive reinforcement and balance correction with praise. Encourage self-correction to reduce anxiety.
Q2. When should I correct errors during a speaking activity?
Correct immediately during accuracy-based activities (e.g., drills). During fluency activities, use delayed correction to maintain flow.
Q3. What if students don’t understand the correction code?
Introduce the code gradually with examples. Practice together in class before expecting independent use.
Q4. How can I encourage peer correction without causing embarrassment?
Establish a supportive classroom culture. Model respectful feedback and emphasize that mistakes are part of learning.
Q5.Should I correct every error in written work?
No. Focus on errors related to the lesson’s objectives and those that impede comprehension. Over-correction can overwhelm learners.
Correcting Learners – A Practice Task
For questions 1-6, match the classroom activity (1-6) with the most appropriate type of correction listed (A-G). There is one extra option which you do not need to use.
Types of Correction
A. Delayed, group-focused correction
B. Immediate, explicit correction of form
C. Peer correction of written drafts
D. Ignoring errors to build confidence and fluency
E. Reformulating the utterance
F. Self-correction using a guidance sheet
G. Using facial expressions to signal a mistake
Classroom Activities
(1) Students are doing a “find someone who…” mingling activity to practice the present perfect. The teacher circulates and smiles but does not interrupt any conversations.
(2) A student is telling a story to the class about a surprise party. They say, “My friends hide in the dark and then they jump on me!” The teacher makes a surprised face and points over their shoulder to indicate past time.
(3) The teacher has set up a “writing clinic.” Students have written the first draft of a story and are now exchanging their texts with a partner to check for mistakes before submitting the final version.
(4) The teacher is conducting a drilling exercise with the whole class, practicing the target structure “I wish I had…” for regrets.
(5) A young learner is showing their drawing and says, “This is my dog. He big and brown.” The teacher responds, “Wow, he is big and brown! He’s lovely!”
(6) After a project where students created travel brochures, the teacher projects several sentences from different brochures that contain common errors and leads a class discussion on how to fix them.
Correcting Learners – Reference Resources
Textbooks
- “Learning Teaching” by Jim Scrivener
A comprehensive guide for teachers, this book delves into practical techniques for classroom management, including methods for correcting learners on their spoken and written errors effectively. - “How to Teach Grammar” by Scott Thornbury
This book offers insights into teaching grammar, with sections dedicated to error correction strategies and how to address common learner mistakes when correcting learners. - “Practical English Usage” by Michael Swan
A reference book that addresses common English language errors and provides explanations, useful for understanding the types of mistakes learners make. - “Teaching English Grammar: What to Teach and How to Teach It” by Jim Scrivener
Focuses on teaching grammar effectively, with attention to correcting learners and feedback techniques. - “The Practice of English Language Teaching” by Jeremy Harmer
A widely used resource that covers various aspects of language teaching, including correcting learners and providing constructive feedback to learners.
Online Resources
- Cambridge English: TKT Handbook for Teachers (Modules 1–3)
Official handbook providing detailed information on the TKT modules, including strategies for correcting learners and learner feedback. - Cambridge English: TKT Module 1: Learner Needs – Teacher’s Notes
Offers insights into understanding learner needs and how to address them, with implications for error correction. - Cambridge English: Resources for Teachers
A collection of free resources, including lesson plans and sample papers, that can aid in teaching and correcting learners. - Cambridge English: TKT Module 1: Describing Language Skills and Subskills – Teacher’s Notes
Provides activities and strategies for understanding and teaching language skills, with a focus on correcting learners. - Cambridge English: TKT Module 1: Motivation – Teacher’s Notes
Discusses ways to maintain learner motivation, which is closely linked to effectively correcting learners and giving feedback.